“Back to school.” Three words that spark both excitement and anxiety for teachers. If you’re planning to use an iPad in the classroom this year—whether it’s your first time or your fifth—it’s worth taking a moment to set up your device properly. The iPad is an incredibly powerful teaching tool, but only if it’s organized and ready for the daily demands of lesson delivery, grading, and classroom management.
If you’ve just unboxed a brand-new iPad, you might want to start with my beginner setup guides instead. For returning users, though, this checklist will help ensure your iPad is optimized for the new academic year. Think of it as your digital “classroom readiness” routine: updating software, organizing teaching apps, syncing cloud storage, and clearing space for student work and multimedia projects.
By investing a little time now, you’ll head into September confident that your iPad can handle everything from running presentations to sharing resources with students—all without the stress of last-minute tech hiccups.
1. Check your remaining storage.
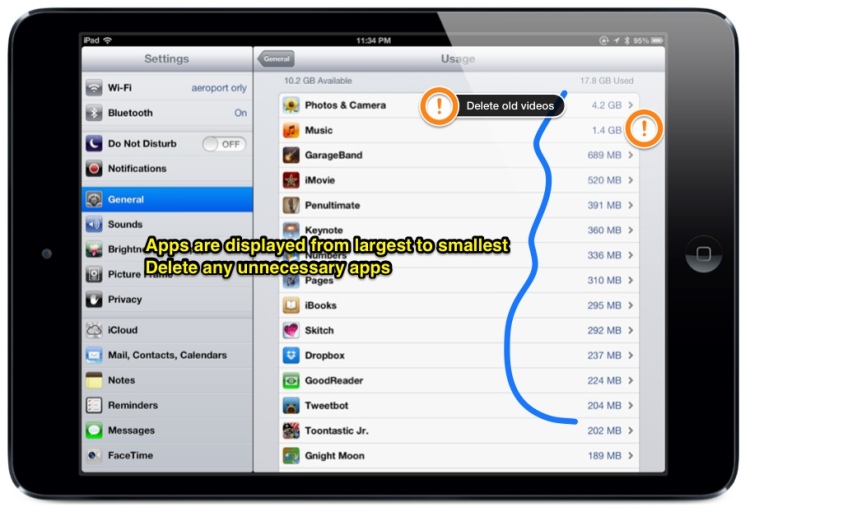
To do this, go to Settings, General, then Usage. Running out of storage is a headache that you can avoid now. Looking at mine below, you can see that my Camera Roll and Music take up the most space.
- Go through your Camera Roll and quickly delete or back up photos and videos of last years students and also any projects that may have been saved there. While you may have loved your class last year, they have moved on and so should you. Check out this post for a way to back them online and off your device. Videos definitely take up the most space. Remove anything that you won’t use in your teaching.
- With my music, I want to have all the songs that I use in teaching, but not songs that I just listen to recreationally. Having iTunes Match allows me to delete ALL my music at once. This doesn’t really affect anything, since my entire collection of music is available for me to download at all times on all devices. If you do not subscribe to iTunes match, you can manually delete songs that you won’t be listening to with your iPad. (Check out my review on the streaming app Musi for an alternate solution that does not take up ANY space on the iPad)
- Now go through the list and delete any unwanted apps from your iPad. Any apps that you have purchased will remain in your account and you will not have to pay for them again. Looking at my list, Garageband takes up a whopping 689 MB, with ZERO projects! iMovie trails by a bit with 520MB. If I will not be using these apps, I can delete them and know that they will be available to me whenever I do need them.
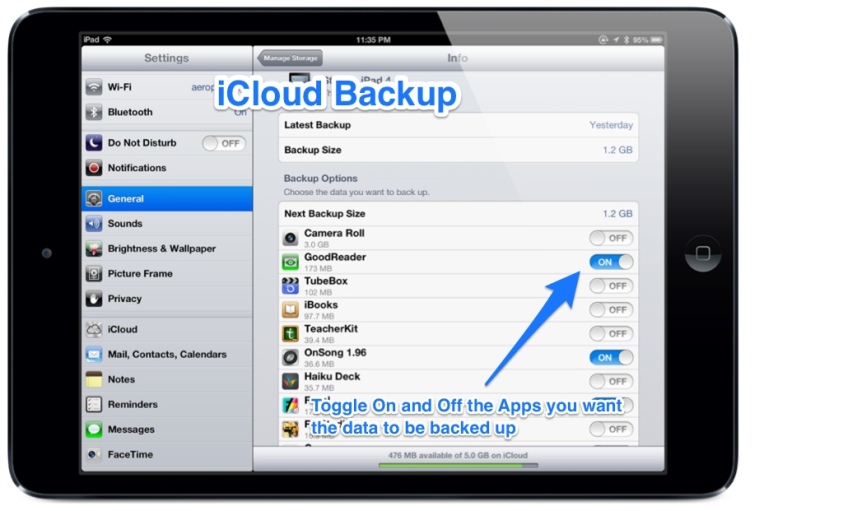
2. Clean out your iCloud Backup
All of you will have at least 5GB of free iCloud storage (some of you might have purchased additional storage from Apple). If you own just one device, than exceeding it won’t be an issue. But if you’re running out like me, you will need to delete some items that don’t really require backup.
iCloud backup is crucial for certain things, but not for others. This backup is important in case you need to restore your device, or get it replaced. However, a lot of apps do not necessarily need their data to be backed up, since they are already backed up in the cloud (Evernote comes to mind as an example).
While in the Settings menu, tap iCloud. Now go through each app that has backup and decide which apps really require backup. Your collection of iBooks is going to already be in the cloud, so you probably don’t need to back it up here.
If you’re inheriting a used iPad:
You will need to decide if you are using apps paid for by yourself or by the school. If you’re starting from scratch and are going to be paying for them by yourself, ask administration if you can delete the iPad and reset. That way you can install any apps that you may have previously purchased under your account.
If you’re lucky enough to have the school pay for your apps, go through the steps above and you’ll be good to go.
3. Optimize Battery Life
A drained iPad battery in the middle of class is every teacher’s nightmare. While iPads generally last a full school day, you can extend battery life with a few smart habits:
- Close unused apps: Background apps can still consume power. Swipe up from the bottom (or use the App Switcher) and close apps you’re not actively using.
- Adjust screen brightness: Lowering brightness or enabling Auto-Brightness reduces energy drain during lessons.
- Enable Low Power Mode: This setting automatically reduces background activity and helps your iPad last through long teaching days.
- Check battery usage: In Settings → Battery, see which apps are consuming the most power and adjust accordingly.
These small steps make a difference when you’re moving between classes, projecting content, or relying on the iPad for full-day instruction.
4. Keep iOS Updated
Each new version of iPadOS (formerly iOS) introduces features that can directly improve your teaching workflow—whether it’s multitasking, classroom management tools, or better file handling. Before the school year begins, make sure your iPad has enough storage for the update (typically 3–5 GB).
- Check for updates: Go to Settings → General → Software Update.
- Free up space: Delete old apps, clear downloads, or back up large videos to cloud storage (Dropbox, Google Drive, iCloud).
- Update early: Don’t wait until you’re in the middle of a busy week—install updates when you have downtime to avoid classroom disruptions.
Keeping your device current not only improves performance and security but also ensures compatibility with the latest educational apps.
Your iPad should be ready to go once you do these steps.
Do you have anything to add to this list? Please let us know in the comments!