AirDrop: A Game-Changer for Classroom File Sharing
When Apple first introduced AirDrop with iOS 7, it immediately struck me as a feature tailor-made for teachers using iPads. A persistent challenge in classrooms has been collecting student work from iPads—especially media-heavy projects like videos or presentations. Without USB ports or SD card slots, transferring files was cumbersome. Email works for small files, but larger projects quickly overwhelm inboxes. Dropbox or similar cloud services can help, but younger students often can’t create accounts due to age restrictions.
Enter AirDrop: a seamless, fast, and wireless way to transfer files between iOS devices using Bluetooth and Wi-Fi.
How AirDrop Works Today
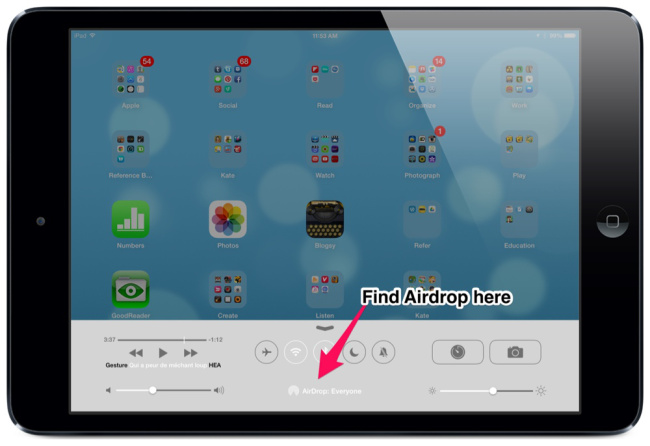
AirDrop requires iOS 7 or later, with both Wi-Fi and Bluetooth enabled. In the modern iOS Control Center (accessed by swiping down from the top-right corner on iPad models with Face ID, or swiping up on older devices), you can quickly toggle AirDrop visibility to Contacts Only or Everyone. If the recipient isn’t in your contacts, choose “Everyone” to ensure the transfer goes through.
Unlike older methods, devices don’t need to share an existing Wi-Fi network—AirDrop creates a secure peer-to-peer connection directly between devices. In my testing, photos transfer instantly, while videos only take a few seconds depending on file size. Files are automatically saved to the recipient’s Camera Roll or opened in compatible apps such as Notes, Contacts, Evernote, or Vimeo.
Classroom Applications for AirDrop
AirDrop has transformed how teachers can collect student work:
- Students can complete assignments in content-creation apps such as Explain Everything, iMovie, Keynote, or GarageBand.
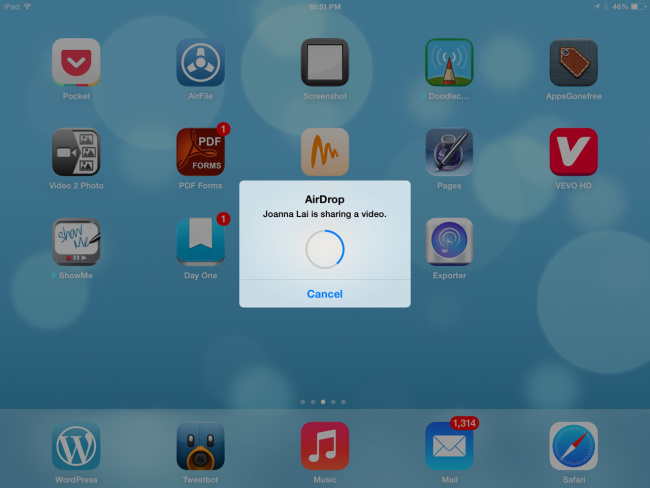
- Once finished, students simply tap the Share button and select the teacher’s device via AirDrop. The teacher clicks Accept, and the file is instantly transferred.
- Projects can then be organized and assessed directly within the teacher’s Camera Roll, saving significant time compared to email submissions.
- For classrooms with strong Wi-Fi and multiple student devices, AirDrop is far faster and more reliable than other file-sharing methods.
Early testing also shows that AirDrop works for sharing Notes, Contacts, PDFs, and even screenshots, giving educators a versatile tool for day-to-day classroom management.
Step-by-Step AirDrop Guide for Teachers: Collect Student Work Effortlessly
AirDrop is one of the most useful iPad features for educators. It allows students to send files—photos, videos, PDFs, and app projects—directly to your iPad without email, USBs, or cloud accounts. Here’s how to set it up and use it effectively in your classroom.
Step 1: Check Device Compatibility
Before planning to use AirDrop, ensure your devices are compatible:
- iPad Air, iPad Pro, iPad mini (all models supporting iOS 14+)
- iPhone 5 and newer
- iPod touch (7th generation or newer)
Note: Older devices may not support AirDrop, even with the latest iOS installed.
Step 2: Enable AirDrop
- Swipe down from the top-right corner (Face ID devices) or swipe up from the bottom (older devices) to access Control Center.
- Press firmly (or long-press) the network settings card to reveal AirDrop.
- Choose one of the options:
- Contacts Only: Only people in your contacts can see your device.
- Everyone: Any nearby iOS device can share files with you.
Tip: In a classroom, “Everyone” is often easier, especially for students not saved in your contacts.
Step 3: Ensure Wi-Fi and Bluetooth Are On
AirDrop uses Wi-Fi and Bluetooth to transfer files. Both sender and receiver must have them enabled. No existing Wi-Fi network is required—the devices create a secure peer-to-peer connection automatically.
Step 4: Collect Student Work via AirDrop
From the Student Device:
- Open the file or project to share (photos, videos, PDFs, Explain Everything, iMovie, Keynote, etc.).
- Tap the Share icon.
- Select AirDrop from the sharing options.
- Choose the teacher’s device from the list.
On the Teacher Device:
- Tap Accept when the incoming AirDrop request appears.
- The file automatically saves to your Camera Roll or opens in the appropriate app.
Tip: Organize files immediately into folders or albums to keep student submissions sorted by class, assignment, or project type.
Future Potential
As iOS evolves, we can expect even more app integration for AirDrop. Already, many third-party apps allow direct saving to the Camera Roll, which makes transferring and managing projects straightforward. The anticipated ability to share seamlessly between iOS devices and Macs will further expand its classroom utility.
Device Compatibility
Unfortunately, AirDrop isn’t available on all devices. Current iOS versions support AirDrop on:
- iPod touch (7th generation)
- iPhone 5 and newer
- iPad mini (all models)
- iPad Air and iPad Pro
Older iPads and iPhones, even if they support the latest iOS, may not include AirDrop functionality.
Conclusion
For teachers, AirDrop is an essential tool. It simplifies file collection, speeds up classroom workflows, and allows students to share creative projects effortlessly. If you haven’t integrated AirDrop into your iPad routine, now is the perfect time to explore its potential—especially for multimedia assignments that previously required cumbersome transfers.